
The Raspberry Pi works fantastically well as a desktop machine. Connecting it to your TV or monitor along with a keyboard and mouse gives you a cheap, powerful setup. You can use it as a normal PC, set up a retro games machine, build a media server and hundreds more applications.
But I’m going to show you how to connect your Raspberry Pi to the real world. We are going to be building circuits that allow your RPi to monitor and control other electronic devices as well as connecting to the Internet so we can start to build our own Internet of Things projects. Having our RPi tethered to a TV and keyboard can become a problem. We want the freedom to put our device wherever we want without cumbersome cables hanging off the circuit board.
We need a headless system!
Guillotine Not Required
In our case a headless system means that won’t use a display or keyboard or mouse. Our Raspberry Pi is going to be totally stand-alone apart from a power connection. This lets us work on our project wherever we want, and even embed our RPi into a boxed solution using a battery pack.
But, “How are we going to see what we’re doing?” I hear you ask.
Good question. We are going to use a remote desktop which will let us control our Raspberry Pi from another computer, tablet or even a phone, just as if we were sat in front of a fully plugged in system.
So let’s get started!
Getting Connected
To start with we’ll need to plug our Raspberry Pi together as normal with a TV and keyboard. There are ways to get straight to a headless system but plugging in will make it much easier.
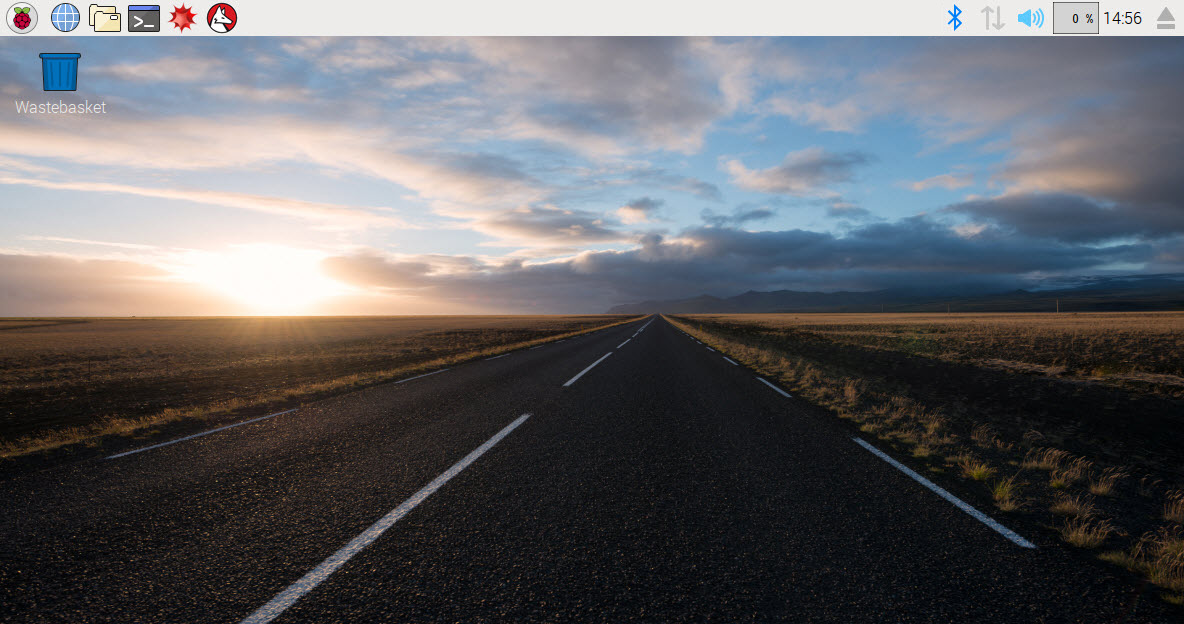
At this point I’m going to assume that you have your Raspberry Pi set up with the latest Raspbian desktop installed using NOOBS.
You should be looking at a screen similar to this.
First we need to connect to your Wi-Fi network. The headless connection relies on our control computer being able to communicate with the Raspberry Pi. Without a network connection it’s not going to work.
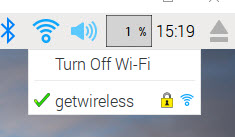
If you click on the network icon in the top right area of the desktop you should get a list of Wi-Fi networks that the RPi can see (if you’re not using a Version 3 RPi you’ll need to connect a WiFi dongle).
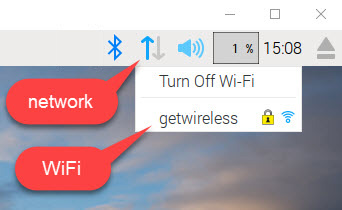
Click on your Wi-Fi signal and then enter your network password. You should now be connected and you should see the network icon change to the familiar Wi-Fi icon. Again if you click this icon you should see the list of networks with a green tick beside yours.
Congratulations your Raspberry Pi is now online!
But it’s not quite online in the way we want it.
Getting Connected Part 2
Every computer on your network has its own unique address. Unless you specify an address your computer will be assigned one by your router. When you turn your computer on you can’t guarantee that the router will give you the same address each time. For our Remote Desktop to work we need to know what address the Raspberry Pi lives at, and we need that to be constant so we don’t have to set up our system every time we want to use it.
We’re going to set up what’s known as a static IP address for our RPi.
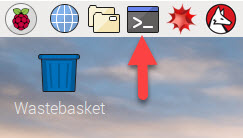
To start with let’s find out what address your router has assigned. The easiest way to do this is using the built-in terminal program. This lets you talk directly to your Raspberry Pi rather than trying to find the correct boxes buried somewhere in the desktop.
To open the terminal simply click its icon at the top of the screen.
Then simply type in the command ifconfig followed by the return key. This command (you will be learning a few over the next weeks) asks the computer to list its network settings. You should see something like this.
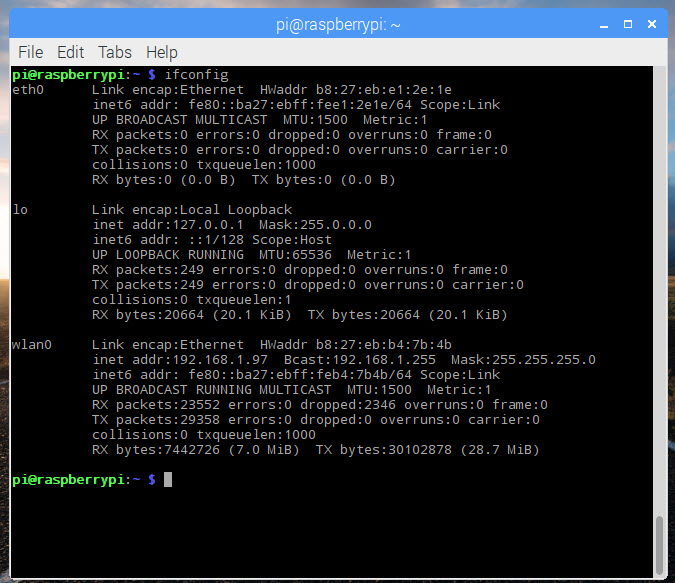
The important section is the one labelled wlan0 and within that block the value labelled inet addr. On my system you can see this is set to 192.168.1.97. Make a note of this value as we’ll need to use a little later on. Our next move however is to change this.
If you right click on the network icon a menu will appear. Click on the Wi-Fi Networks Setting option. This will bring up a network preferences dialogue box. We want to configure the wlan0 interface, so select that using the top two drop downs as shown below.
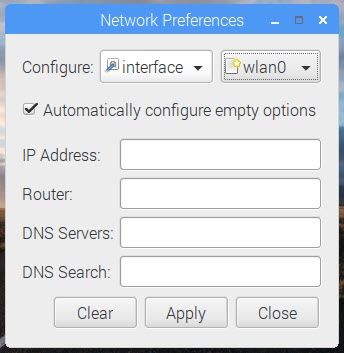
We are now telling the Raspberry Pi what settings to use when it connects to Wi-Fi. All we need to fill in is the IP address that we want our system to use. But which one do you choose?
Choosing an IP Address for Your Raspberry Pi
IP addresses are used to connect to servers over the Internet as well as on your local network at home or in the office. There are special ranges of addresses that are reserved for use on your own network. We need to use a value from one of these.
Most home networks use IP addresses in the range 192.168.1.0 to 192.168.1.255. If you look at the address your router assigned you it will probably match this block. Routers usually have a block of addresses they dish out to devices as they connect to the network. We need to try and miss this block so that our static IP address doesn’t get reissued by the router.
If the final number in the IP address you were issued is greater than 100 we’ll start using addresses at 192.168.1.50 for our static IPs. If the final number is less than 100 then will start using addresses that 192.168.1.150.
For my setup I’m going to choose the IP address 192.168.1.150.
So, type this number into the IP address box and click the apply button.
We need to reboot the Raspberry Pi for this change to take effect. For a change let’s do it using the terminal. Open up your terminal window again and this time type the command reboot and hit the return key. The Raspberry Pi should reboot.
Getting Ready for Remote Desktop
Our networking is now set up. Time to move on to the control computer connection.
The current versions of Raspbian come preconfigured to use something called VNC Server. This allows other computers to connect to and control your RPi. All we need to do is turn it on.
Open your applications menu (the raspberry icon in the top left corner) and expand this out to get to the configuration menu.
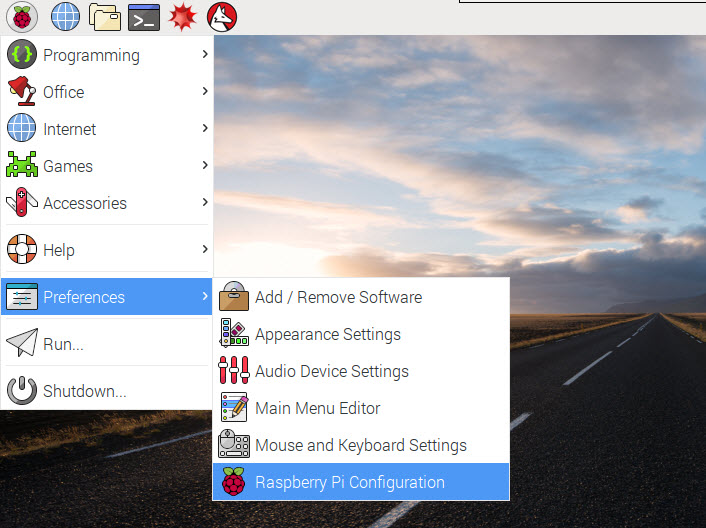
In the configuration menu go to the interfaces tab and enable SSH and VNC as shown below.
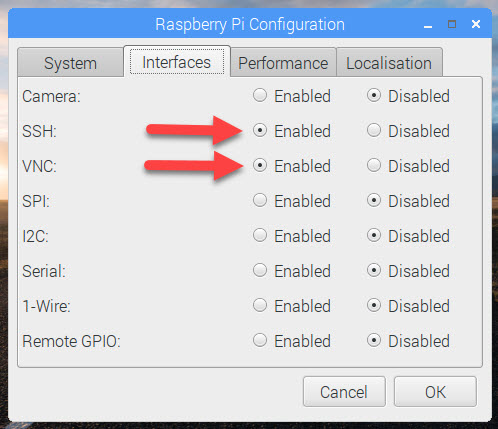
Click OK and then reboot. When the system restarts you should see a VNC icon in the top right area.
The Raspberry Pi is now ready to receive our Remote Desktop connection.
Connecting to Remote Desktop
The final step is to get some other device such as your laptop to connect and control the Raspberry Pi. I’m going to take you through setting up a laptop or desktop computer but there are a whole range of apps you can use on Android and iOS devices (just search for VNC).
On the computer you want to use open up your web browser and go to
https://www.realvnc.com/download/viewer/
Make sure it’s asking you to download the VNC viewer. Then click on your operating system and download button. Once you’ve downloaded the software open it and install it. Just accept all the default settings and it should work fine.
You should now have the VNC viewer software on your computer. Open it up and you should see the following screen.
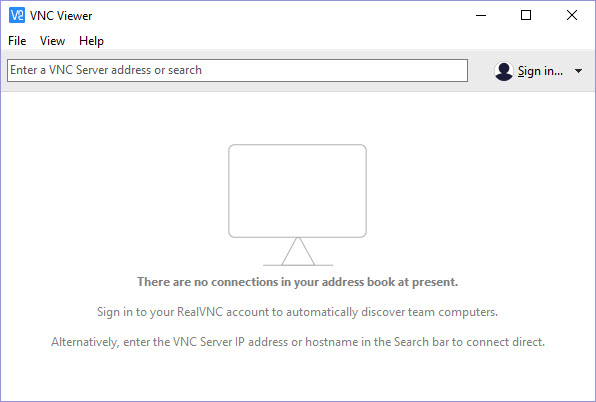
In the address bar type in the IP address you set for your Raspberry Pi. When you hit the return key it should ask you for your login credentials. It’s now talking to your Raspberry Pi. Login with your normal RPi account (pi / raspberry), check the “remember password” box if you want and then click OK.
A new window should pop up showing your Raspberry Pi desktop.
You should now be able to use your computer to control your RPi.
Going Headless
We are now ready to go headless!
Power down your Raspberry Pi and disconnect your monitor and keyboard so you’re just left with your power connection (and Wi-Fi dongle if you’re using one). Plug in the power lead again.
Wait a few moments for it to power up and then go back to your computer and connect using your VNC viewer. If all’s gone well you should be looking at the Raspbian desktop.
But it might look a bit small!
Let’s sort that out in the next lesson.
Summing up for Today
The Raspberry Pi is incredibly versatile. It can be used as a standard PC but there’s so much more we can do with it. In this tutorial we’ve seen how we can configure the RPi in different ways to control how it connects to a network and how we can then control it. You’ve had a brief introduction to the terminal window which is a very powerful tool you’ll need to get familiar with.
If you’ve enjoyed this make sure you subscribe to my newsletter or connect to one of my social channels to keep up-to-date with the latest articles and tutorials.